


Finned valve covers on a Dakota V6
By Mike Bade
Here’s what I did to change out the valve covers on the 3.9L V6 in my ‘30 Plymouth hot rod.
 I had been looking for something to dress up the engine on my street rod project. I was lookingfor a more retro look under the hood. There did not seem to be anything that appealed to me.There is plenty for Fords and Chevys, what do you do if you are a Mopar guy with a V-6?
On a garage tour to Schroeder Speed & Customs - Troutdale, OR (912 NW Corporate Dr, Troutdale, OR 97060, 503-674-8207), I saw a pair of finned V-6 valve covers for a GM motor sitting on the floor, which he said were for sale. I took tracing of them to see if it might be a good fit. Turned out it was a perfect match. I liked the look of these GM finned valve covers, so I came up with the idea to make an adapter plate, so I could bolt them onto the Dakota V6.
Basically the template for the adapter is drawn up on paper, then scanned and cut out on a water jet, out of 3/8 steel.
To begin, you could take one of the old valve covers off and draw around it to get the engine-side of the adapter. A scan of an original valve cover gasket would also do the job. It may require a little cleaning up on the computer.
I then printed it out, used an cutting blade to trim to finished size. I used a hand hole punch to cut out the bolt holes, then laid the paper on the engine block to make sure all of the holes were in the correct location.
I turned the finned valve cover, finned side down and I laid the cut out to check to make sure it fit inside the bottom of the finned valve cover, trimming a little as needed. Then I marked the holes for the finned valve cover where they needed to be. I went back to my computer and put the measurements for these holes into the program.
I reprinted the template, trimmed, the template again, punched the holes, checked alignment again on both the engine block and the bottom of the finned valve cover. I repeated the process until all lined up.
During the process I was careful to keep track which side was up and down, in case the holes on the engine and the valve cover were not matching.
I printed out a final version of the template, used a sharpie to make it all black.
I took it to Gasket Specialties, 13035 NE Airport Way, Portland, OR 97230 · (503) 257-8816
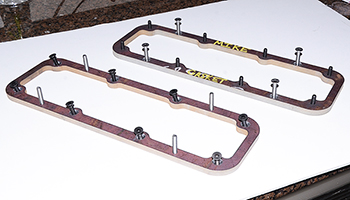
They used a water jet to cut my template out of 3/8 in. steel plate.
I was surprised to see how clean and accurate it came out, even the holes!
The template fit just like the paper template, except I had to use my drill to enlarge the bolt holes somewhat, which gave a little wiggle room for the whole thing. I put all the head bolts in to check
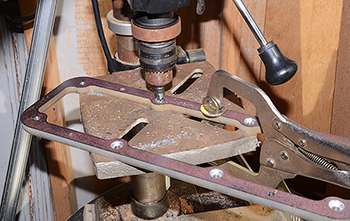 The holes to bolt to the head are countersunk on the top side of the adapter, to bolt downward on to the engine block. I used a drill press to keep things square, checking so as not to drill too deep. The holes to bolt the new finned valve cover are countersunk on the bottom of the adapter to hold the new finned valve covers. (Bolts and countersink Drill Bit available at Parkrose Hardware, OR).
I test fitted all the bolts, bolted it down to the engine head/block and placed finned valve cover on, all fit really well.
I used the stock Dodge Dakota valve cover gasket on the engine side of template and you can use the same template for the adapter and have Gasket Specialties cut out a gasket for the between the adapter plate and the Finned Valve cover.
 I was in a hurry to get process done, because I was headed to a car show 850 miles away. One thing I should have done was to MIG/TIG weld the valve cover bolts facing up on the bottom side, or use "lock tight", to keep them from turning when I tightened down. They were tight, but I have a little oil leaking and need to go back to remedy the leaking.
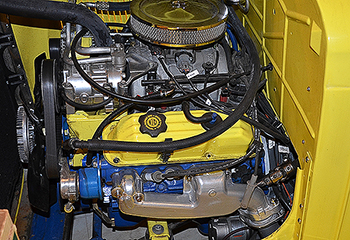
Oh, I forgot to mention there was a little modification I had to do to make the finned valve cover fit. On the passenger side of the engine the valve cover was hitting the copper bolt on the Alternator. I had to grind off about 3/8 in. Also the plastic insulator around the bolt, slides off and I ground it down part way. I also used a grinder to shave the tightening bolts to make them thinner. When all was done, I had just enough room to put together and rubber insulating boot over the bolt. Whew!
Then on the driver's side of the engine, the bracket holding the air conditioning compressor, had to be notched out. I used my grinder to take out approx. 1/2 in by 1-1/2 inch area (see pictures). If the valve cover is off, be sure to use rags or
something to keep any of the metal shavings from getting down into the engine block.

___________________________________________________________________