
Rubberizing Parts & Pieces
Off The Hook – Rubberizing Parts and Pieces
By Phil Lapin / Technical Committee & President
It would be hard to find anyone who is handy that doesn’t have a pair of pliers, or a wrench. Most of these items nowadays have a rubber/plastic coating on the handles. Not everyone knows how easy this coating process is to do at home, and how readily available the material is.
Back in the 1940s, products called “plastisols” were developed. These are PVC resins dispersed in a plasticizer – resulting in a liquid of significant viscosity. The material can then be dipped, sprayed or used in molds. Plastisols are still widely used today. The one problem with most of them is that they require heat to cure, which is not often practical in a homeowner situation.
 In 1972, a new company named PLASTI DIP International started up in Minnesota. They worked with plastisols, but developed a new version which could be air cured at room temperature. They named it “PLASTI DIP”. Today there are a wide variety of PLASTI DIP products, the most useful for garage mechanics being dippable and spray versions of the original product. They are available in several common colors. The company website is www.plastidip.com. Big box stores like Home Depot carry a limited inventory of the products (basic black and white) in the paints section, but there are many variations which can be purchased elsewhere.
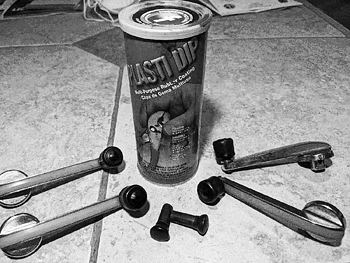
I typically buy the dippable type, sold in a 14.5 ounce metal can. It comes sealed with a pop top metal lid, and a plastic lid for later storage. Do not buy more (or open more) cans than you can use in a few weeks. It tends to thicken after opening, although it can be thinned if checked regularly.
What have I used it for – aside from dipping tool handles? On my 1942 Plymouth, I dipped all of the cracked and discolored window crank handle knobs black. I also dipped the rear door lock buttons. I also plan on coating some of my dash knobs. I painted it on a few under hood parts, as well as painting various electrical connections.
Application is fairly simple, but there are some tricks and rules. First, a single coat is often not thick enough, so 2-4 dips spaced about an hour apart builds a nice thick surface. PLASTI DIP out of the can is fairly thick, but it will still flow and contour to the surface. It takes several minutes to “set up” in air, so plan on some flow (the thicker it comes from the can, the more time it will flow.) If it becomes too thick, solvents can thin it back down in the can.
 With window crank knobs as an example, I first masked off the metal part of the cranks near the knobs. I then dipped the knobs carefully, holding them at an angle into the can. You need to withdraw them slowly to get an even coat. Planning on some flow, I kept the outer ends of the knobs facing upwards as it set up. I coated the knobs entirely – right up to the metal handles, and let the material flow downward onto the handle area. After multiple coatings, I used a razor blade to cut the PLASTI DIP flush with the base of the knobs, peeling off the waste and the tape. On smooth surfaces like chrome, drips can be peeled right off of the surface with some work. If coating old plastics that are cracked, a body filler can be used to first fill the cracks.
I have not used the spray cans of PLASTI DIP, but can imagine several projects that could use this type of application. I believe a good benefit of the spray cans is that the material will not thicken when stored in the pressurized can.
One last interesting use of PLASTI DIP is spray painting entire cars! Available in 1 gallon cans, less than $400 in material will paint a whole car. Multiple spray gun coats are required ( after masking off lights, windows and trim.) If you have never heard of this, you might now notice cars (typically with younger drivers) that have a rather dull colored paint surface. Why is it used? Because you can paint a car one color, then later peel it off and respray it with another color! It will also protect the base paint (think rock and chip protection!) There are several YouTube videos showing this process.
At under $8 for a can of the dipping version, it is not expensive. Give it a try – it is really an interesting, fun and useful product.
.
